Start here
Print-Shop Manager runs on your own Windows computers. One of them, your main computer, holds the shop's database and shares it over your local network. Every other computer connects to it, so everyone sees the same live jobs. Setup takes about an hour for most shops. Do these in order:
- Pick your main computer and check every computer meets the requirements.
- Put every computer on the same network: Wi-Fi, or Ethernet cables if you don't have Wi-Fi.
- Install and activate on the main computer with your license key.
- Run Shop Setup so the app matches the way you decorate.
- Turn on secure backups and write down your recovery key.
- Connect your other computers and create an account for each person.
Then enter a real job with the first order tutorial.
Every plan includes help moving your customers and open jobs over. E-mail [email protected] or book a live demo and we'll walk through it with you.
See pricing or book a live demo first. Your license key and installer are in your account once you sign up.
Step-by-step tutorials
Short guides for the jobs you'll do most. Each one takes a few minutes.
Install and activate
Download the installer, enter your license key and sign in for the first time.
10 minutesRun Shop Setup
Tell the app how your shop decorates so it builds your stations, job routes and starter prices.
5 minutesYour first order, from quote to paid invoice
Add a customer, price the job, move it through the shop and invoice it.
15 minutesArtwork and proofs
Upload a design, clean it up, send a proof and record the customer's sign-off.
10 minutesSet up secure backups
Choose where backups go, save your recovery key and run the first one.
10 minutesAdd more computers and people
Connect other PCs to your main computer and give each person their own account.
10 minutesSwitch from monthly or yearly to lifetime
Pay once and stop the subscription. Same license key, nothing to reinstall.
3 minutesManage billing in your account
Change your card, download receipts, cancel a plan or move your license to a new computer.
3 minutesRun Shop Setup
5 minutesShop Setup is the quickest way to make the app fit your shop. Nothing in it is permanent: you can run it again whenever you add a new method.
Open it
It opens by itself the first time an admin signs in. To open it later, use the ⋯ menu › Shop Setup or Settings › Shop Setup.
Pick your decoration methods
Tick everything you run: screen print, embroidery, DTF, DTG, vinyl, sublimation and more.
Say what most of your work is
Choose your main method and how many machines of each kind you have. The app uses this to size your stations and routes.
Choose the pages you want to see
Pick which optional pages the shop should see. Nothing is limited by shop size.
Finish and check the result
Open Production to see your stations, and Management Dashboard › Decoration Pricing to adjust the starter prices. Stations and workflows you already had are left exactly as they were.
Your first order, from quote to paid invoice
15 minutesThis is the whole life of a job. The video shows it on a demo company, and the steps below tell you where to click on your own.
Add the customer
Go to Sales Team › Customers, add the customer with their contact details and pricing tier.
Quote it (optional)
In Sales Team › Quotes, price the job and send it. When the customer says yes, use Convert to order(s). If you skip the quote, create the order directly.
Enter the order
In Sales Team › Orders, add garments, sizes, print locations and the due date. Mark it Rush if it is. The price is filled in from your pricing grid.
Get the artwork approved
Attach the design and record the customer's sign-off before anything is made. The artwork and proofs guide shows how.
Move it through the shop
A work order reaches the floor on its own and shows on the Order Board. At each station, click Finish job — send to…, or scan the job's QR ticket.
Invoice and record payment
When the job is complete, open Sales Team › Invoicing, create the invoice, e-mail it and record the payment. Any deposit set on the quote is credited automatically.
The Customer Portal inside the app lets customers approve proofs and quotes and pay invoices from a private link. Open Sales Team › Customer Portal to set it up.
Artwork and proofs
10 minutesNothing goes to production until the proof is approved. This is how artwork gets from a customer's file to a signed-off proof.
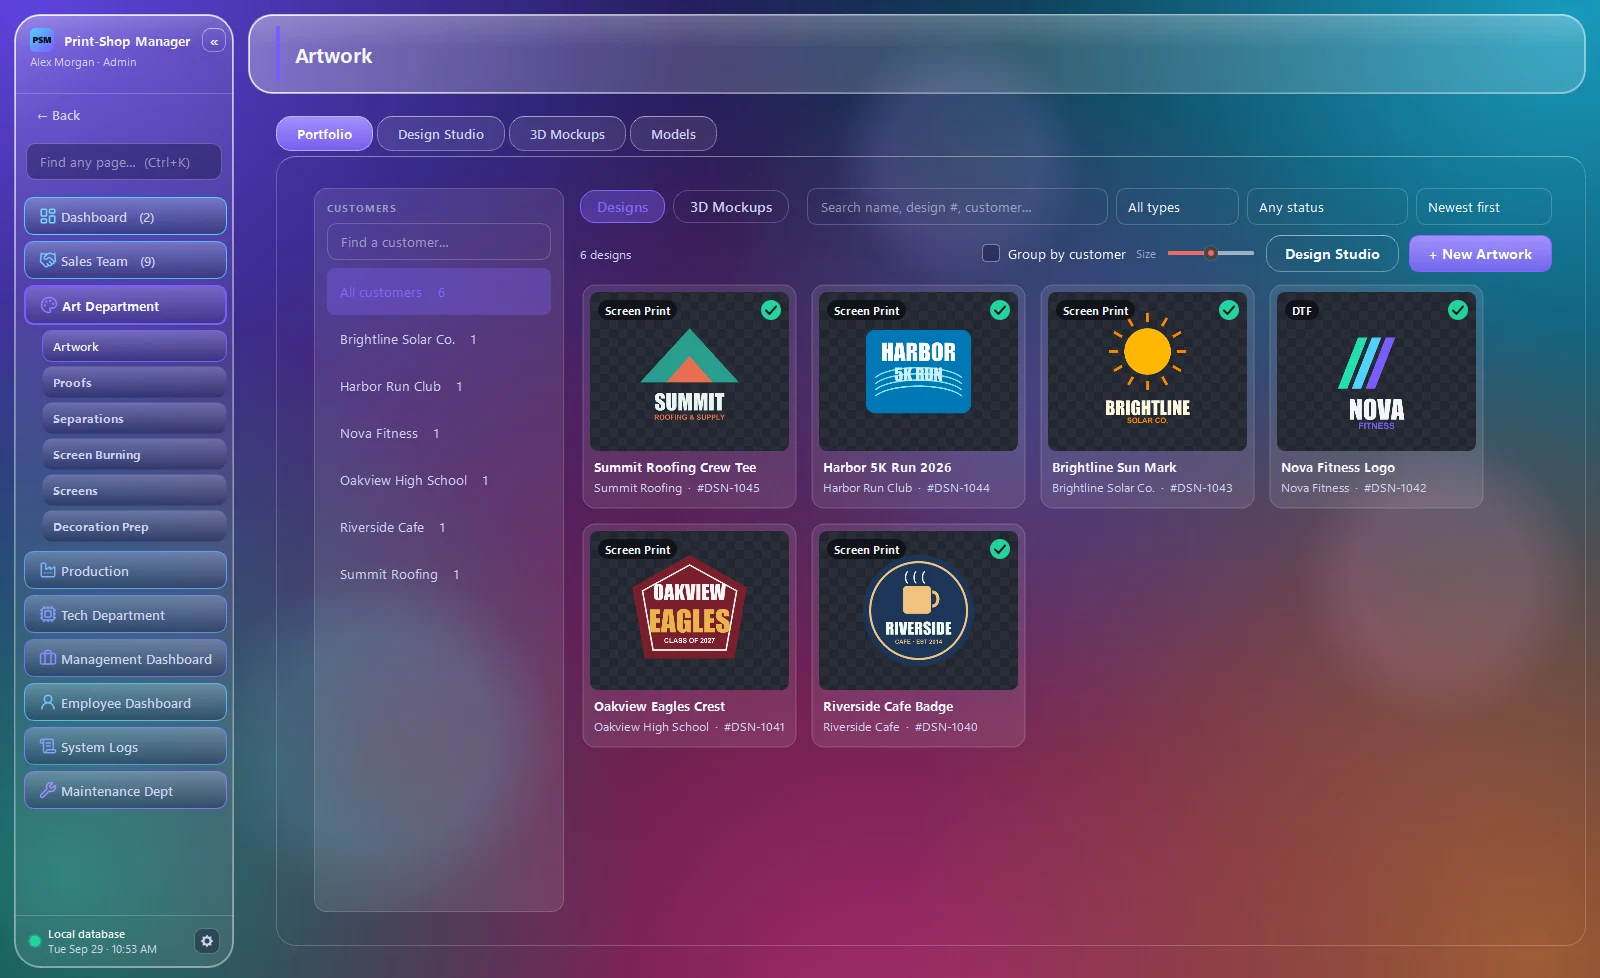
Add the artwork
Open Art Department › Artwork and click New Artwork. Upload the customer's file and give it a name you will recognize.
Clean it up if needed
In the Design Studio tab you can remove a background or turn a bitmap logo into clean vector art. The video below shows a customer's JPG made ready for screens.
Show it on a garment
The 3D Mockups tab places the design on a garment so the customer sees what they are buying.
Send the proof
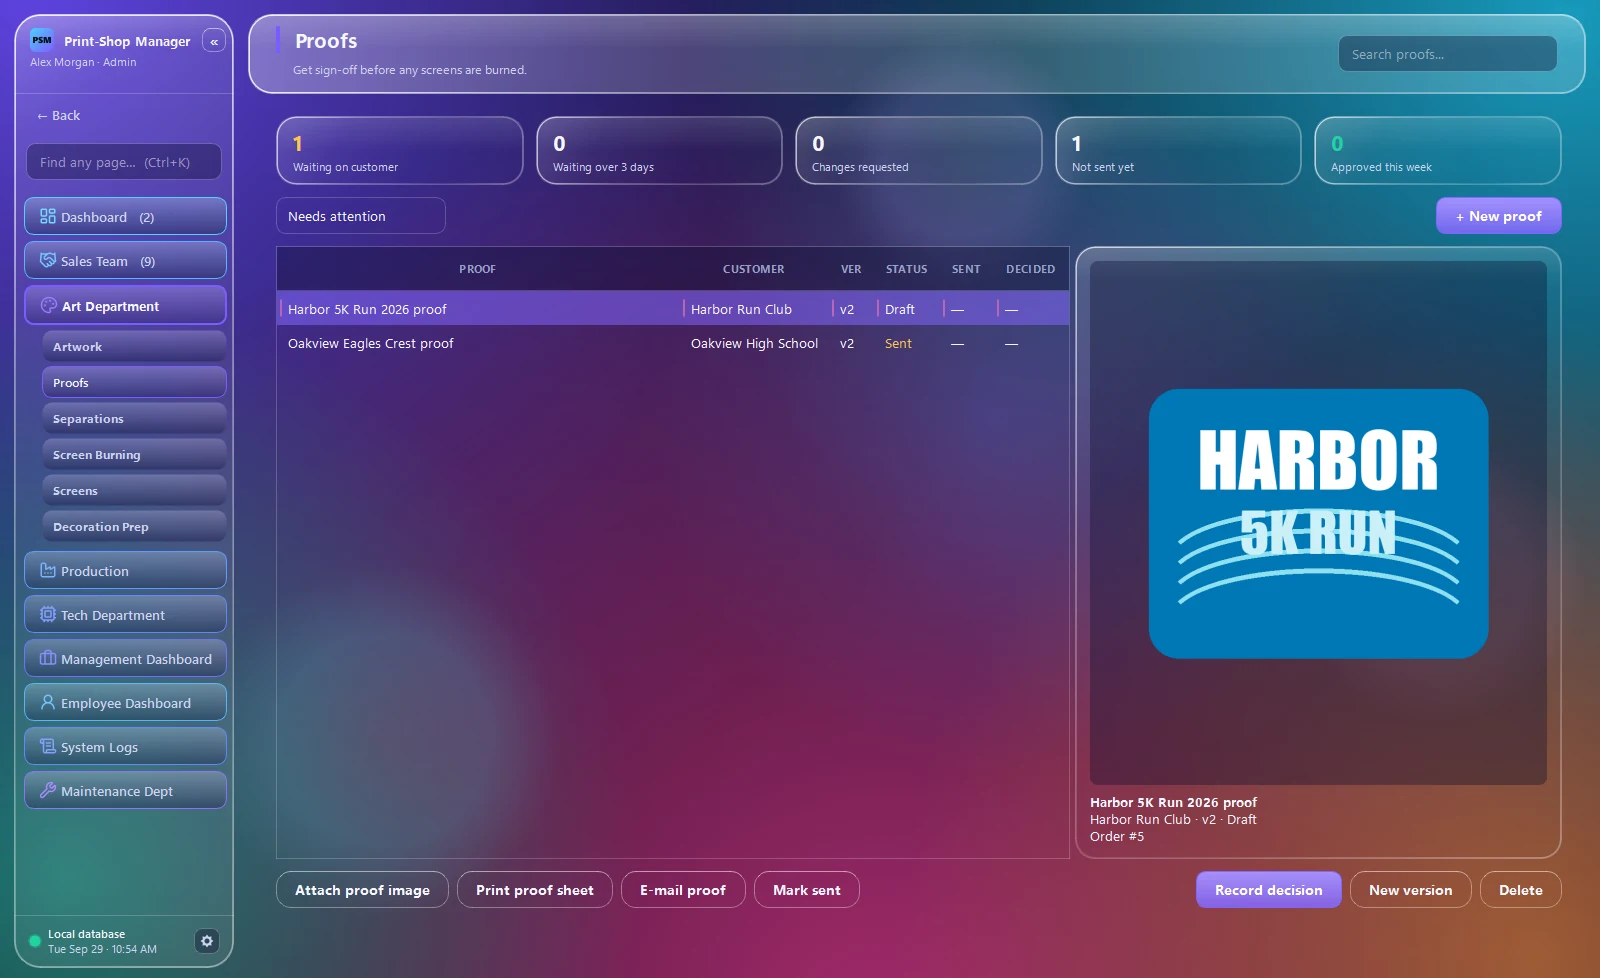
Open Art Department › Proofs, click New proof, attach the proof image, then use E-mail proof (or Print proof sheet). The status changes to Sent.
Record the answer
When the customer replies, select the proof and click Record decision. If they want changes, click New version and send it again.
Make the screens (screen printers)
An approved proof clears the design for Separations, which builds a film for each color, and then for Screen Burning.
Switch from monthly or yearly to lifetime
3 minutesThe lifetime license is $4,499 once, with no renewals. If you are on the monthly or yearly plan you can switch at any time. Your license key and your data stay as they are, and the subscription billing stops.
Sign in to your account
Go to your account and sign in with the e-mail you bought with.
Find “Own it for good”
It appears under your license on the account page while you are on a monthly or yearly plan. The price shown there is your price today.
Click Upgrade to lifetime
You go to Stripe's secure checkout. Check the amount, pay, and you are returned to your account.
Keep working
Your plan changes to Lifetime. You do not need to reinstall or enter a new key. Settings › License shows your plan and status.
Monthly customers get $150 off the lifetime price for 30 days once their first paid month is complete (after the 7-day trial). The account page shows the discounted price while it is available. After that window the regular price applies.
Manage billing in your account
3 minutesEverything about your plan lives on your account page at getprintshopmanager.com/portal. You sign in with Google or your e-mail.
See your license and plan
Each license shows its key, whether it is active, and for monthly plans the date it is paid through. Copy the key with the copy button.
Change your card or cancel
Click Manage billing & card. That opens Stripe's billing page, where you can update your card, see your full billing history and cancel.
Get a receipt
Receipts and invoice PDFs for every payment are listed under Orders & receipts, and Stripe e-mails your receipt when you pay.
Download the installer again
The Downloads section always has the current installer. Run it on your main computer; the key is shown right above it.
Replace your main computer
Make a fresh backup first. Then click Move to another computer next to the activated computer, and install and activate on the new one. The Updates & upkeep section has the full list.
Monthly $150 a month, yearly $1,500 a year (two months free), or $4,499 once for lifetime. See pricing.
System requirements
Server is your main computer — the one that holds the database, runs backups and doubles as the shop's print server. Client is every other computer that connects to it. A single-computer shop only needs the server column.
| Requirement | Server (main computer) | Client (each extra computer) |
|---|---|---|
| Operating system | Windows 10 (version 1809 or later) or Windows 11, 64-bit | Windows 10 (version 1809 or later) or Windows 11, 64-bit |
| Processor | 4 cores — Intel Core i5 / AMD Ryzen 5 or better | 2 cores minimum; 4 cores recommended |
| Memory (RAM) | 8 GB minimum · 16 GB recommended | 4 GB minimum · 8 GB recommended |
| Storage | SSD with 20 GB free (app ≈ 1 GB, plus room for your database and artwork to grow) | 2 GB free for the app |
| Screen | 1920 × 1080 recommended | 1366 × 768 minimum · 1920 × 1080 recommended |
| Graphics | Any DirectX 11 / OpenGL 3.3 graphics (built-in is fine) for 3D mockups | Same — only needed on computers that use 3D mockups |
| Network | Wired Ethernet recommended, with a fixed (reserved) address | Same local network as the main computer — Wi-Fi or Ethernet |
| Internet | Needed to activate, and for e-mail, card payments, reorders, AI art and updates | Only for updates, AI art and the built-in browser |
| Power | On during shop hours, sleep turned off, battery backup (UPS) recommended | No special needs |
| License | Your license key activates here | No key needed — joins the main computer |
Windows only — Macs, Chromebooks, tablets and phones aren't supported. Any USB or Bluetooth barcode scanner that types like a keyboard works for QR scanning; Zebra-style label printers (port 9100) and most office printers work through the built-in print server.
Every computer must be on the same local network as the main computer. If your shop has no Wi-Fi — or a computer is out of range — plug each one into your router, or into a network switch connected to it, with an Ethernet cable (Cat 5e or better). Wired is also the most reliable choice for the main computer and for stations on the shop floor.
Choosing the main computer
- Use a desktop that stays in the office and stays on during shop hours — not a laptop that leaves the building.
- If the main computer is off or asleep, the other computers can't reach the data until it's back.
- Don't use a computer that's also someone's personal machine; its Windows account holds the data's encryption key.
Network setup
Everyday work runs over your shop's own network, not the internet — so if your internet goes down, orders, artwork and the shop floor keep working.
Put every computer on one network
Connect them all to the same router — over Wi-Fi, or with Ethernet cables if you don't have Wi-Fi. A cheap unmanaged network switch adds more wired ports. Guest Wi-Fi networks usually block computers from seeing each other, so use your main network.
Give the main computer a fixed address
In your router's settings, add a DHCP reservation (sometimes called "static lease") for the main computer. Its address — for example
192.168.1.42— then never changes, so the other computers don't lose it.Mark the network as Private in Windows
On the main computer: Settings › Network & internet › (your connection) › Network profile type › Private.
Allow Print-Shop Manager through the firewall
The first time the main computer hosts, Windows asks whether to allow Print-Shop Manager on the network. Tick Private networks and click Allow (this needs an administrator once). If it was dismissed, add an inbound rule for TCP port 8420 in Windows Defender Firewall.
Never port-forward 8420 on your router or expose the main computer to the internet. Other computers join with the shop's network key, which is meant for your trusted local network only. To work in the app away from the shop, use a VPN into the shop. (The optional read-only phone overview needs no VPN.)
Install & activate
Download the installer
Sign in to your account and download Print-Shop Manager. Your license key is on the same page.
Run it on the main computer
If Windows shows "Windows protected your PC", see the fix below. No administrator rights are needed.
Activate
On first launch choose This is the shop's main computer — it holds the data, paste your license key and click Activate. This needs an internet connection. No internet on that computer? Choose Use a license file…, send us the computer ID shown, and we'll e-mail you a file.
Sign in and set your password
Sign in with username
adminand the starting passwordadmin26. You'll be asked to choose a new password straight away (the starting one is refused) — keep it somewhere safe.
Add more computers
Extra computers don't need a license key and never store the shop's data — they read and write the main computer's database live.
Find the address and network key
On the main computer's sign-in screen, under Connection › Host on this computer, note this computer's address (e.g.
192.168.1.42:8420) and the network key (e.g.K7QP-9MZX-4RTA). The status bar shows the address too once you're signed in.Install on the extra computer
Run the same installer. At first launch choose Join the shop's main computer over the network (or leave the installer's company name blank).
Connect
Pick Connect to another computer, enter the address and network key, then sign in with that person's own account.
Give each person their own account
On the main computer, open Tech Department › Admin Users. Choose a role for each person (office, art, production, shipping, manager…) and they'll only see the pages that role needs. Every change they make is recorded in System Logs.
Getting started in the app
Once you're signed in, work through these in order. Each one takes a few minutes, and nothing here is permanent: you can change it all later. For detailed walkthroughs, see the tutorials.
Run Shop Setup
It opens by itself the first time an admin signs in (later: ⋯ menu › Shop Setup or Settings › Shop Setup). Tell it which methods you run — screen print, embroidery, DTF, DTG, vinyl and more — which one most work uses, and how many machines you have. It builds your stations, the route each kind of job takes and a starter price grid, and hides pages you'll never use.
Check your prices
Open Management Dashboard › Decoration Pricing and adjust each method's grid — by stitch count, print size or colors, with quantity breaks. Use Try it to test a quote. Screen printers can keep using Price Charts.
Bring your data over
Management Dashboard › Import & Export reads CSV and Excel files, including Printavo and QuickBooks exports and SanMar or S&S catalogs. You'll see a preview before anything is saved, and every import can be undone.
Connect e-mail and payments
In Settings › Email add your shop's e-mail account so PSM can send proofs, invoices and order updates. To take cards by QR code, add your own Stripe key under Management Dashboard › Payments.
Enter your first order
From Sales Team › Orders, create an order for a customer. It's priced from your grid and lands on the Order Board and Center Hub, where every station can see what's next.
Attach artwork and send a proof
In Art Department › Artwork upload the design (or create one in the Design Studio), make a 3D mockup, then send it from Proofs. Record the customer's sign-off — nothing goes to production until it's approved.
Move it through production
Each station page shows its queue. Click Finish job — send to… to pass the job along its route, or print a QR ticket from QR Labels and scan it at each step.
Invoice and get paid
When the job ships, create the invoice from Sales Team › Invoicing, e-mail it, and record the payment. Send it to QuickBooks from Import & Export if you use it.
Let automations do the chasing
In Management Dashboard › Automations, switch on rules such as due-date alerts, proof follow-ups, "order ready" e-mails and low-stock purchase orders.
Press F1 anywhere in the app (or open the ⋯ menu › Help & Guide) for a searchable manual that walks through first-day setup and every department. The app speaks English, Spanish, French, Portuguese and German — switch under Settings › Language.
Every dashboard and department hub can be rearranged: drag tiles to move them, right-click to hide one, or click Customize to add live widgets. Layouts follow each person to any computer.
Recommended secure backup setup
Your data lives on your own hardware, so backups are your safety net against a dead drive, theft, fire or ransomware. PSM backs up automatically from the main computer: each backup is a single .zip of the database and artwork, checked for damage before it's kept. Everything inside is already encrypted (AES-256).
Your data is encrypted with a key that only works on the main computer's Windows account. To restore a backup on a different computer — for example after the main one dies — you need the recovery key. Open Settings › Server Backups › Show recovery key…, write it down, and keep it in two safe places away from the backups themselves (for example a locked drawer and a password manager). Without it, a backup can't be opened on another computer — not even by us.
Follow the 3-2-1 rule
Recommended setup
- Back up once a day and when the app closes (the default)
- To an external USB drive, not the main computer's own disk
- Recovery key written down
- Back up every 4 hours, keep 30 or more
- To a NAS or a dedicated external drive for fast restores
- Plus an off-site copy: a OneDrive, Dropbox or Google Drive sync folder
- Recovery key in two safe places
- Battery backup (UPS) on the main computer
- Everything in Recommended, backing up hourly
- NAS snapshots or cloud version history, so ransomware can't overwrite old copies
- Two USB drives rotated weekly, one always unplugged and off-site
- A test restore every three months
Set it up
Open Server Backups on the main computer
Settings › Server Backups — backups are managed only on the computer that holds the data.
Choose where they go
Pick the NAS share, external drive or cloud sync folder. The default is
Documents\Print Shop Manager Backupson the same disk — fine for day one, but move it off that disk as soon as you can.Set how often and how many to keep
Hourly, every 4 hours, daily or weekly, with a time of day. Keep Include attachments on so artwork is saved too, and keep Back up when the app closes on.
Run one now
Click Back up now and check the new file appears in your folder.
Keep it secure
- Encrypt the main computer's drive with BitLocker (Windows Pro) or Device Encryption, and protect its Windows account with a strong password.
- Give the backup folder its own account on a NAS, so only the main computer can write there, and turn on the NAS's snapshots.
- Don't leave the only backup drive plugged in forever — ransomware can reach any drive it can see.
- Backups run while PSM is open on the main computer, so leave it signed in during shop hours. A failed backup raises an alert on the Dashboard — don't ignore it.
Restoring
In Settings › Server Backups, pick a backup and click Restore. It's applied the next time the app starts, and the database it replaces is kept as a safety copy. On a new computer, install PSM, then restore — you'll be asked for the recovery key.
Everyday use
Find anything
Pages are grouped by department in the sidebar: Sales Team, Art Department, Production, Tech Department, Management and Maintenance. Your role decides which ones you see.
Scan to move jobs
Print QR labels for work orders, bins, supplies, screens and machines. A scan anywhere in the app opens the item with the next action; press F8 to type a code by hand.
Print from any computer
The main computer is also your print server. Add printers under Settings › Print Server, then point documents, box labels or film at them from Settings › Printers on any computer.
Report a problem
Press F9 (or use the button on every station page) to open a tech or maintenance ticket — even without access to those departments.
Plan capacity
The Capacity page shows the load on every press, embroidery head and printer. A machine marked down by a maintenance ticket is blocked until it's fixed.
See who changed what
Admins can open System Logs to see every sign-in and change, who made it and when.
Updates & upkeep
- Updates: every computer checks for a new version twice a day and shows Update x.y.z in the sidebar. Updates are signed and checked before they install. Update the main computer first — the others will tell you if they're on a different version. See Settings › Updates.
- Windows: keep Windows Update on, but set active hours so the main computer doesn't restart mid-shift.
- License: monthly plans check in once a day from the main computer. Settings › License shows your plan and status.
- Replacing the main computer: make a fresh backup, click Move license to another computer… in Settings › License, then install and activate on the new computer and restore with your recovery key.
Troubleshooting
- An extra computer can't connect to the main computer
- Check the main computer is on and signed in, both are on the same network (not guest Wi-Fi), the address and network key match what's on its sign-in screen, and the firewall allows TCP 8420 on Private networks. If the address changed, set up a DHCP reservation (see Network setup).
- There's no Wi-Fi where a computer is
- Run an Ethernet cable from the computer to your router or a network switch. Powerline adapters or a mesh Wi-Fi point also work if running a cable isn't practical.
- "Hosting on this computer needs an activated license key"
- You chose Host on a computer that isn't your main one. Pick Connect to another computer instead.
- "This company's data is locked — it needs its recovery key"
- The data was moved from another computer or Windows account. Enter the recovery key you saved from Server Backups.
- Someone forgot their password
- An admin can reset it in Tech Department › Admin Users.
- Windows says "Windows protected your PC"
- The installer isn't code-signed yet, and Windows warns about software it hasn't seen many downloads of. Click More info, then Run anyway. Only run the installer you downloaded from your account on getprintshopmanager.com.
E-mail [email protected] — Monday to Friday, 9 a.m.–3 p.m. Eastern. We reply within one business day. Include your app version (Settings › Updates) and a screenshot if you can.
Roadmap
Where Print-Shop Manager is heading. This is direction, not a promise: no dates, and the order moves with what shops ask for.
Up next
What we most want to build first.
- Work from anywhere, not just lookThe phone overview is read-only today. Next: approve proofs and quotes, see the live order board and get alerts on your phone, without a VPN.
- Mobile companion appiPhone and Android: job board, QR ticket scanning, proof approval and clock in.
- Storefront builderTeam, fundraiser and corporate web stores that feed orders straight into PSM.
- Code-signed installerRemoves the Windows “unknown publisher” warning.
Planned
On the list, after the items above.
- More supplier catalogsalphabroder, Delta Apparel, Augusta and more, next to SanMar and S&S.
- XeroJoins the QuickBooks Online and Desktop export.
- Automatic sales tax by ship-to addressOn top of today’s per-customer tax rate and exemptions.
- Built-in carrier labelsFedEx and UPS label printing, beyond the ShipStation, Shippo and EasyPost connections.
- Public API and Zapier connectorLet shops wire PSM into their own tools.
- Mac supportClient first, then the main computer.
- Sales pipelineFollow quotes from first contact to won or lost.
- Longer support hoursIncluding phone support.
Exploring
Ideas we're weighing. Tell us if you'd use them.
- Online product designerShoppers design on a garment in the browser.
- Browser-based read-only viewA lightweight view for managers.
- Outside-vendor profilesTrack jobs you send out to contractors.
- Wide-format and wrap quoting
- Service-job moduleInstalls and repairs.
- Custom domain for the customer portal
Recently shipped
Already in your app.
- Phone overview (v1.12)Switch it on in Settings and check open orders, what is due, who is clocked in and unpaid invoices from your phone at getprintshopmanager.com/shop/. Read-only, one page per shop.
- Upgrade to lifetime from the app (v1.11.1)Monthly and yearly customers are offered the lifetime license inside the app, with a one-time $150 off after the first paid month. The license key stays the same and nothing needs reinstalling.
- Yearly plan (v1.11.2)Pay $1,500 a year instead of $150 a month (two months free).
- Customer portal (v1.11)Customers use a secure link to see order status, approve or decline proofs and quotes, and pay invoices online.
- Live supplier stock and pricing (v1.11)Per-size availability by warehouse and your own prices from SanMar and S&S, inside quotes, orders and purchase orders.
- Shopify order sync (v1.11)Orders from a connected Shopify store become PSM jobs automatically.
- Text-message updates (v1.11)Order received, proof ready and ready for pickup, by SMS through Twilio, only for customers who opted in.
- Integrations (v1.10)ShipStation, Shippo, EasyPost and any API key, plus signed webhooks for Zapier, Make and n8n.
- Five languages (v1.9)English, Spanish, French, Portuguese and German across the app and this site.
- Report an Issue button (v1.9)Send a bug or idea from inside the app.
- Bitmap to vector (v1.8)Turn a logo into clean vector art.
- Time Clock and Web Apps (v1.6)Clock in from the sidebar and keep your supplier sites signed in.
- Shop Setup (v1.4)The app configures stations, workflows and pricing around the way you decorate.
The most-requested ideas go first. Tell us what you need and we'll add your vote.
Was this guide helpful?
Tell us what's missing or confusing, or suggest a feature. We read every message.